Menu

Chrome River Logo

Chrome River Training Resources

Mt. SAC has implemented Chrome River to automate travel and non-travel related expenses.

With Chrome River you will be able to:

  • Submit expense reports electronically
  • Upload your receipts through your phone or web browser
  • Approve submitted expense reports online or through your email

Explore the Frequently Asked Questions (FAQ) 

Learn how to use Chrome River by clicking the video resource links below:


Chrome River Training Videos (Click title link for larger version with steps)

Introduction to Chrome River

  • Learn the benefits of using Chrome River
  • Learn how to install Chrome River and Chrome River SNAP on your mobile device
  • Access Chrome River through the Mt. SAC portal
  • Register an alternate email address within Chrome River
  • Set up delegates within Chrome River to create reports on your behalf
  • Select other users to create reports on their behalf

Creating Conference and Travel Pre-Approval Reports

  • Learn how to create Pre-Approval  reports
  • Learn how to edit and submit a Pre-Approval report
  • Find out how to track submitted Pre-Approval reports and see who needs to approve them

Creating P-Card Expense Reports

  • Understand the rules of P-Card use through Chrome River
  • Learn how to create P-Card expense reports
  • Learn how to edit and submit a P-Card expense report
  • Find out how to track submitted expense reports and see who needs to approve them
Additional Chrome River Videos (Click title link for larger version with steps)

Creating Direct Pay Expense Reports

  • Learn how to create Direct Pay expense reports
  • Learn how to edit and submit a Direct Pay expense report
  • Find out how to track submitted expense reports and see who needs to approve them

Approving Reports in Chrome River

  • Learn how to approve expense reports from your email or within Chrome River

COMBINED VIDEO: Introduction, Pre-Approvals and Direct Pay together

  • One combined video that goes over those key functionalities.
  • Content is the same as the other videos, combined for convenience
Additional Chrome River Videos (Click title link for larger version with steps)

Creating Conference and Travel Expense Reports

  • Learn how to create Conference and Travel expense reports
  • Learn how to import a Conference and Travel Pre-Approval report
  • Find out how to track submitted expense reports and see who needs to approve them

How to Link P-Card Expenses on Conference and Travel Expense Reports

  • Learn how to Link P-Card expenses on Conference and Travel expense reports if you are the owner

FAQs

  • Questions?
  • Explore our Frequently Asked Questions below

Frequently Asked Questions

Last updated: 3/15/22

General

    • What do I use Chrome River for?

      Chrome River is used to electronically submit conference & travel pre-approvals, conference & travel expenses, direct pays for employees ONLY, and to reallocate p-card transactions.

    • How do I sign in to my portal?

      From the Mt. SAC Homepage, click "Portal" in the top right and enter your log in credentials.  

    • Where do I find Chrome River?

      Once you are logged in to the Employee Portal go to the "Employees" tab at the top and you will find the Chrome River portlet.  You will be connected to Chrome River through single sign on and will not have to enter your credentials again. 

    • I am having technical issues approving requests through email. 

      Problem: When accepting a submitted request through email, a web browser opens instead of the email application.
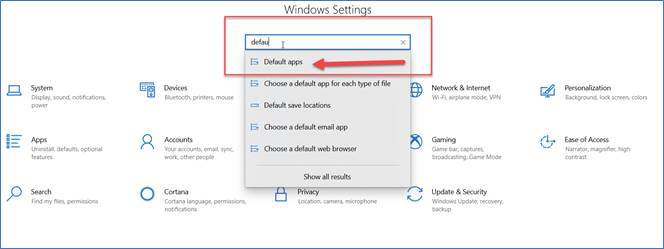
      Solution: Change your default Email application from your web browser to Outlook.

      • In Windows, click your Start icon to open the Start Menu
      • Next click the Gear icon to open your Settings
      • In the Settings Search type in "Default Apps" and click the result
        •  Screenshot showing the Windows Settings Menu with Default Apps typed in and highlighted
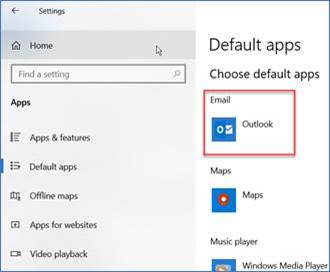
      • Click the default Email app and change it to Outlook
        • Screenshot showing the Default applications menu with the email app and Outlook highlighted
    • I am having technical issues approving requests because of an unmatched email address.

      Problem: When accepting a submitted request I get the error message "You recently tried to approve the following report, however we could not match your email address [your.email@mtsac.edu] in our systems. Please Review."
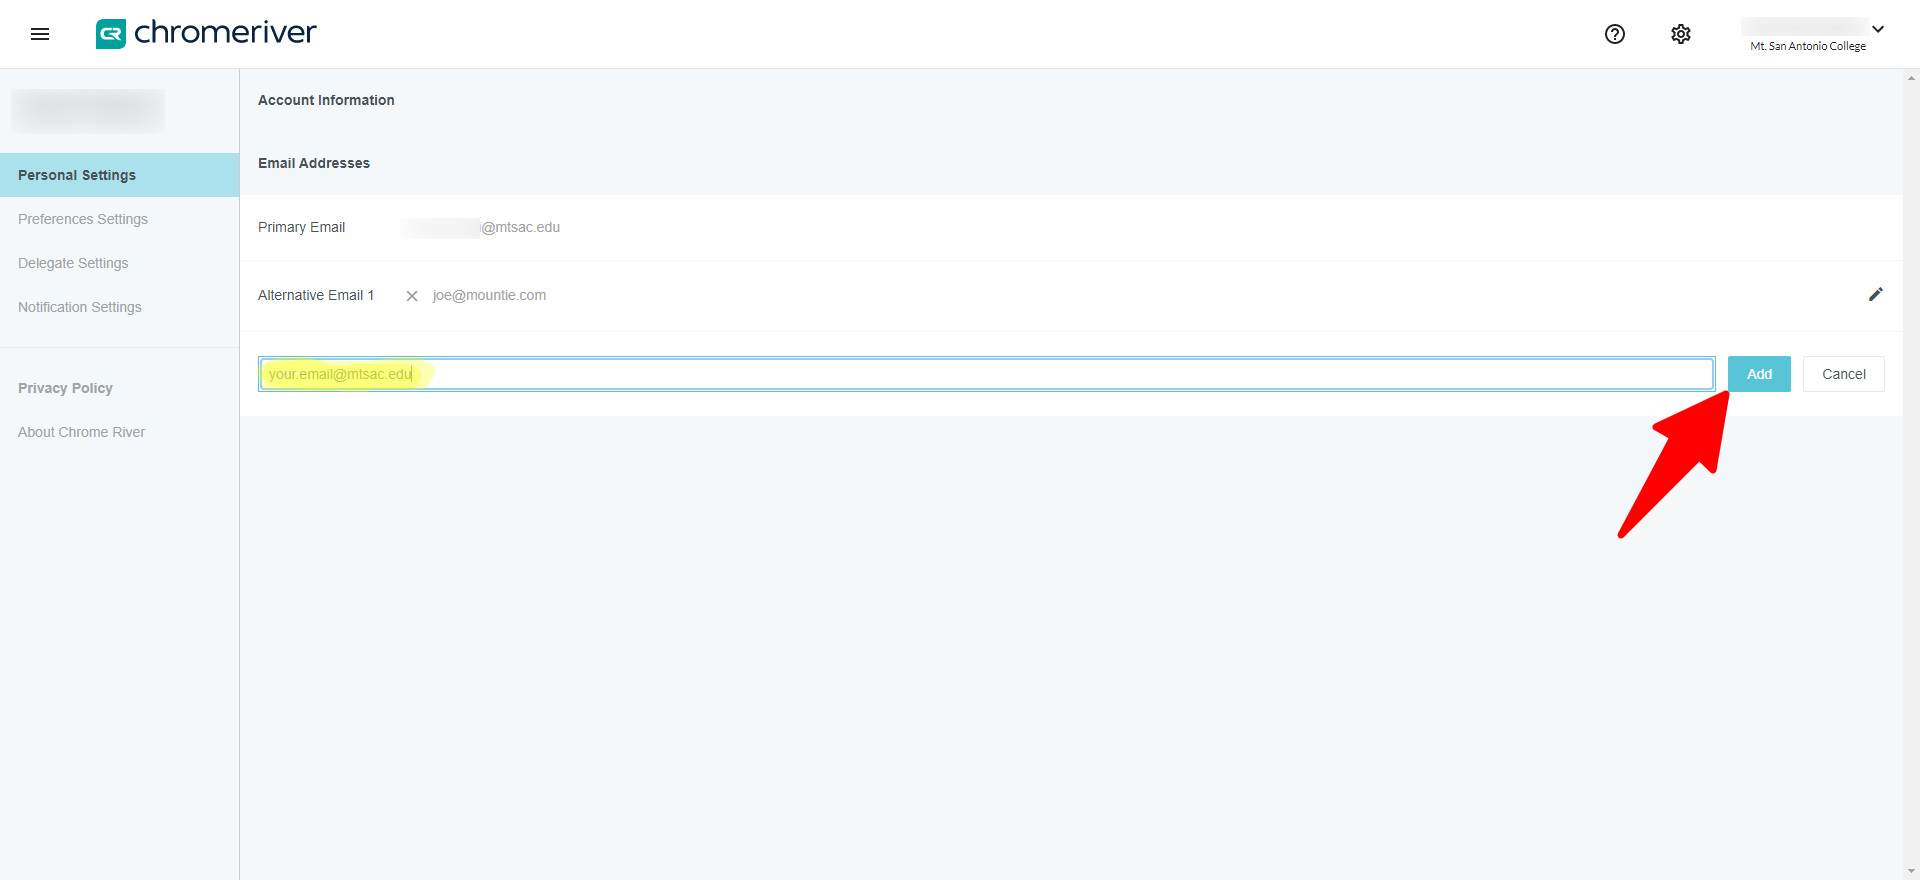
      Solution: Add the email address noted in the message to your Chrome River profile.

      • Log into Chrome River and go to your account settings

      Chrome River Homepage with arrow pointing at the gear icon in the top right corner

      • From the Chrome River account settings page, select the Add Alternative Emails button.

      Chrome River Settings page with an arrow pointing at the Add Alternative Email button

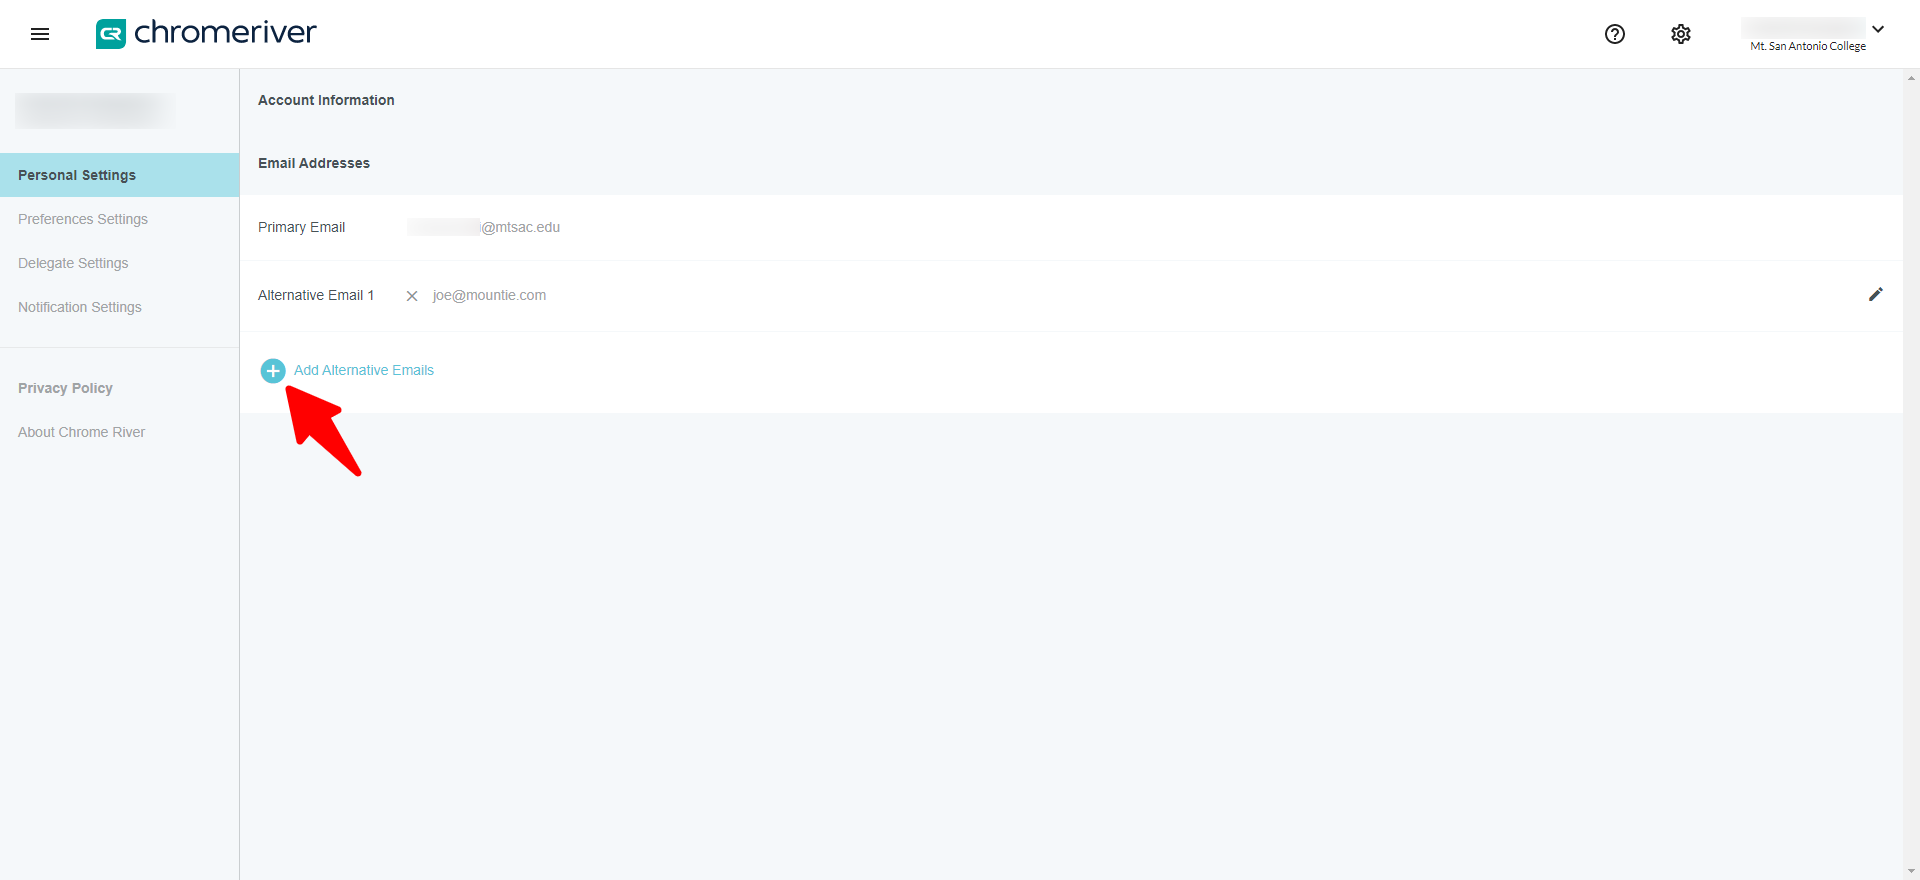
      • Enter the email address noted in the error message and click the Add button

      Chrome River Account Page with your.email filled into the alternate email field and an arrow pointing at the Add button

Pre-Approval

Expense Report


Contact

Contact Subject Email
Chrome River Conference and Travel, P-Card, Direct Reimbursements Chromeriverhelp@mtsac.edu
Fiscal Services Non Conference and Travel Employee Reimbursements AccountsPayable@mtsac.edu
Purchasing P-Card Support Purchasing@mtsac.edu


Introduction to Chrome River

    • 1Install the Chrome River App on your mobile device (0:50 - 1:29)

      Optional: Only if you would like to access Chrome River from your mobile device

      • Navigate to the Google Play or Apple App store and search for "Chrome River"
      • Install the app to your device and open
      • Enter your Mt. SAC email address
      • The first time you login, you will need to enter a code that was sent to your email
      • Enter your portal username and password to log into your Chrome River account
    • 2Install the Chrome River SNAP App on your mobile device (1:30 - 2:16)

      Optional: Only if you want to easily upload receipts to your Chrome River account using your phones camera

      • Navigate to the Google Play or Apple App store and search for "Chrome River SNAP"
      • Install the app to your device and open
      • Enter your Mt. SAC email address
      • The first time you login, you will need to enter a code that was sent to your email
      • The first time you open the App, it will ask to use your camera. Choose "While using the app"
      • Frame the receipt and hit the shutter button
      • Tap upload to sent the receipt to your Chrome River account
    • 3Accessing Chrome River from a web browser (2:20 - 2:40)
      • Navigate to www.mtsac.edu and login to your portal
      • From the tab links at the top click  the "Employees" tab
      • Click the blue Chrome River button from the Chrome River portlet
    • 4Adding an alternate email to your Chrome River account (2:41 - 3:26)

      Optional: Add an alternate email if you would like to send receipts to Chrome River from an email address that is not your Mt. SAC email

      • Log into Chrome River
      • From the Dashboard click your name from top right corner and select "Settings" from the drop-down menu
      • Click the "+ Add Alternative Emails" button
      • Enter your alternate email
      • Verify this new alternate email by clicking the link sent to your Mt. SAC email address
    • 5Adding delegates to your Chrome River account (3:27 - 4:21)

      Optional: Add a delegate if you would like to give someone the ability to create reports on your behalf. Approval delegates require a set time of access to be specified

      • Log into Chrome River
      • From the Dashboard click your name from top right corner and select "Settings" from the drop-down menu
      • Select "Delegate Settings" from the left side-bar
      • Click the "+ Add New Delegates" button
      • Enter the person's name or select them from the drop-down menu
      • For approval delegates click the "+Add New Approval Delegates" button
      • Enter the person's name or select them from the drop-down menu
      • Enter a Start and End date and click Save
    • 6Selecting other users (4:23 - 5:00)

      Optional: Selecting another user allows you to create reports and allocate transactions on their behalf. They must have already set you as a delegate

      • Log into Chrome River
      • From the Dashboard click your name from top right corner and select "Select Another User" from the drop-down menu
      • Type the name of the user in the search field to filter, and click to select them
      • The selected user's name will appear in the top right of the toolbar
      • To revert back to your username click on the name in the top right corner and select "Revert To" from the drop-down menu


Creating Conference and Travel Expense Reports

    • 1Creating a Pre-Approval Report (0:10 - 1:44)

      A Pre-Approval report is required before you travel and is not used for direct payments

      • Log into Chrome River to access the dashboard
      • Select the "+ New" button from the top toolbar and click "New Pre-Approval Report" from the drop-down menu
      • Fill out each field in the form
        • For the Report Name enter "Conference and Travel"
        • Start Date and End Date is the period of your trip
        • In Business Purpose enter the name of the conference you are attending
        • In Report Type select either "Employee Travel" or "Student Travel"
        • For Travel Type select either "In State" or "Out of State"
        • Cash Advances should only be used for student travel meals
        • Select the Fiscal Year you will be traveling in
        • In the Allocations section choose the correct one from the drop-down menu or start typing the name or account number to filter the list
      • Click "Save" from the top toolbar
    • 2Adding estimated expenses to the report (1:45 - 3:32)
      • Select the appropriate tile for the type of expense you are adding
      • Enter the Estimated Amount
      • For Description add some details about the expense
      • Click the "Save" button from the top
      • Repeat until you have added all your estimated expenses
      • To Delete or Edit an added expense, select it from the left menu and click the "Delete" or "Edit" button from the top right toolbar
      • Once everything is completed click the green "Submit" button
      • Certify all expenses are true and correct by clicking the green "Submit" button again
    • 3Tracking submitted Pre-Approval Reports (3:34 - 5:19)
      • On the Chrome River dashboard there is a PRE-APPROVAL ribbon on the left side
      • Click the "Submitted" section of the PRE-APPROVAL ribbon
      • Select the Pre-Approval Report you would like to track
      • Click the "Tracking" button from the top right
      • You can click on each step in the "Routing Steps" section to view more information on the approving process for that step
      • When all approvals have been received you will receive a confirmation email from Chrome River
      • To close a Pre-Approval Report that is partially used, partially applied, or no longer needed, navigate back to the Pre-Approvals and select the report
      • Click the "Expire" button from the top right menu
      • Confirm by clicking the "Expire" button again


Creating P-Card Expense Reports

    • 1Locating P-Card expenses (0:53 - 2:33)
      • Log into Chrome River to get to the dashboard
      • Select the menu button from the top right corner and select "eWallet"
      • Select "Credit Card" from the right menu's side bar to show only P-Card or travel related expenses
      • You can click the small arrow on an expense to show more details about the expense
    • 2Creating an Expense Report (3:28 - 4:45)

      Statement periods run from the 26th of the month to the 25th of the following month

      • Select the "+ New" button from the top toolbar and click "New Expense Report" from the drop-down menu
      • Ignore "Import from Pre-approval"
      • Fill out each field in the form
        • For the Report Name the convention is "P-Card, LastName, FirstInitial, StatementDate"
          • For example, "P-Card, Mountie, J, 1/25/21"
        • Start Date and End Date is the statement period
        • In Business Purpose enter the convention is "P-Card transactions for statement period ending StatementPeriod"
          • For example, "P-Card transactions for statement period ending 1/25/21"
        • In Report Type select "P-Card"
        • The Fiscal Year will default to the current fiscal year
      • Click "Save" from the top toolbar
    • 3Adding expenses to the report (4:46 - 8:00)

      Do not select "Create New" when creating P-Card allocations

      • Select "Credit Card" from the left side bar
      • Select the transactions that need to be expensed for the statement period when your finished click the "Add" button
      • The first transaction will appear, some fields will automatically be filled out for you
      • In the Description field enter what the charges were for
      • If the transaction is categorized as "Miscellaneous/Other" select the appropriate account in the Misc Expense drop down menu
      • In the Allocations section choose the correct one from the drop-down menu or start typing the name or account number to filter the list
        • If you need to split Allocations between multiple accounts, click the "+ Add Allocation" button and select another Allocation
        • Split the Allocation by the desired amounts
      • Attach a receipt by clicking the "Add Attachments" button and selecting the receipt
        • Receipts may automatically merge with your transaction if they are already uploaded to your receipt gallery
      • Click "Save" from the top toolbar
      • If there is more than one transaction, your next will appear. Repeat the previous steps until all transactions have been allocated
    • 4Editing allocated transactions and submitting the report (8:01 - 10:26)
      • Select the transaction you would like to edit and click the "Edit" button from the top toolbar
      • Make any changes or fix any errors and click the "Save" button from the top toolbar
      • A yellow triangle indicates a warning, you must provide an explanation if required before the report can be submitted
      • If you would like to allocate another transaction select the "+" button from the top left menu
      • If you would like to delete an allocated transaction, select the transaction from the left menu and click the "Delete" button from the top toolbar
      • Once your finished click the green "Submit" button to submit the report
      • Certify all expenses are true and correct by clicking the green "Submit" button again
    • 5Tracking submitted Pre-Approval Reports (10:27 - 12:05)
      • On the Chrome River dashboard there is an EXPENSES ribbon on the left side
      • Click the "Submitted" section of the EXPENSES ribbon
      • Select the P-Card Expense Report you would like to track
      • Click the "Tracking" button from the top right
      • You will see a list of P-Card expense types, select the line item you would like to track
      • You can click on each step in the "Routing Steps" section to view more information on the approving process for that step
      • When all approvals have been received you will receive a confirmation email from Chrome River
    • 6Recalling P-Card Expense Reports (12:06 - 13:27)
      • On the Chrome River dashboard there is an EXPENSES ribbon on the left side
      • Click the "Submitted" section of the EXPENSES ribbon
      • Select the P-Card Expense Report you would like to recall and click the "Recall" button from the top right of tool bar
      • Click "Yes" when prompted to recall the report to your drafts section
    • 7Itemizing Transactions (13:28 - 17:25)

      You will need to create a new expense report for each transaction that requires itemization

      • Follow Step 2 to create and save a new expense report
      • Select the transaction that will need to be itemized and click the "Add" button
      • Click on the category tile from the top of the transaction and select the "Itemization" tile
      • Enter the Allocation fund, organization, or program
      • Attach a receipt by clicking the "Add Attachments" button and selecting the receipt
      • Click the "Itemize" button from the top toolbar
      • Choose the tile category that corresponds to the expense
      • Enter the amount in the Spent field and add what the expense was in the Description field
      • Click the "Save" button from the top tool bar
      • Click the "Itemization" button again from the top toolbar to start the next allocation
      • Select another category tile and follow the previous steps to allocate any remaining amounts
        • If the transaction is categorized as "Miscellaneous/Other" select the appropriate account in the Misc Expense drop down menu
      • Click the "Save" button from the top tool bar when your finished
      • Address any warnings and Submit the report

Creating Direct Pay Expense Reports

    • 1Creating a New Expense Report (0:07 - 0:45)
      • Log into Chrome River to access the dashboard
      • Select the "+ New" button from the top toolbar and click "New Expense Report" from the drop-down menu
      • Fill out each field in the form
        • For the Report Name enter "Direct Pay"
        • Start Date and End Date of the statement period
        • In Business Purpose enter the reason for the expense report
        • In Report Type select "Direct Payment"
        • For Travel Type select either "In State" or "Out of State"
        • Cash Advances should only be used for student travel meals
        • Select the Fiscal Year this report takes place in
      • Click "Save" from the top toolbar
    • 2Adding Expenses to the Expense Report (0:46 - 1:57)
      • Select "Create New" from the left side bar
      • Select the "Direct Pay" tile
      • Select the transactions that need to be expensed for the statement period when your finished click the "Add" button
      • Fill out each field in the form
        • For Date enter the date of the expense
        • In Spent enter the amount
        • The Business Purpose should already be filled from what you entered earlier
        • In Description enter what was purchased
        • In Merchant enter the name of the vendor
        • For Account select the correct account from the drop-down menu
        • In the Allocations section choose the correct one from the drop-down menu or start typing the name or account number to filter the list
        • Attach a receipt by clicking the "Add Attachments" button and selecting the receipt
          • Receipts may automatically merge with your transaction if they are already uploaded to your receipt gallery
      • Click "Save" from the top toolbar
    • 3Review and Submit the Expense Report (1:58 - 2:32)
      • Review your transaction from the left side area
      • Click the "Edit" button if you need to make changes
      • If everything is correct click the green "Submit" button to submit the report
    • 4Tracking Submitted Expense Reports (2:40 - 3:56)
      • On the Chrome River dashboard there is an EXPENSES ribbon on the left side
      • Click the "Submitted" section of the EXPENSES ribbon
      • Select the Expense Report you would like to track
      • Click the "Tracking" button from the top right
      • You can click on each step in the "Routing Steps" section to view more information on the approving process for that step
      • When all approvals have been received you will receive a confirmation email from Chrome River
      • If you need to recall a expense report navigate back expense report
      • Click the "Recall" button from the top right menu
      • Confirm by clicking the "Yes" button
      • The report will be moved back into the Drafts section of the EXPENSES ribbon

Approving Expense Reports in Chrome River

    • 1Approving a Submitted Report Through Email (0:08 - 1:01)

      As an approver you will receive emails from Chrome River notifying you of pending requests

      • The email will contain a summary of the request
      • You can approve it by clicking the green "APPROVE" button or deny it by clicking the red "RETURN" button
        • Before you approval  report you MUST review the receipts attached by clicking the Receipts "View" link provided in the email
      • If you choose to approve, you will taken to a second email where you can add additional comments
      • You can also view and approve the request directly in Chrome River by clicking the "click here" link located at the bottom of the email

      If you have an alias on your email or have it forwarded to another account and receive an error message when attempting to approve a request, you will need to set up an alternate email inside Chrome River. Refer to the Chrome River Introduction Video to learn how.

    • 2Approving a Submitted Report in Chrome River (1:02 - 2:31)
      • Log into Chrome River to access the dashboard
      • If you have pending requests, you will see an orange APPROVALS ribbon on the left side
      • Click on "Expense Reports" or "Pre-Approvals" to navigate to the respective request
      • On the left side, click on the report you would like to approve
      • Clicking the "Open" button from the top-toolbar will bring up a summary of the report
      • To view the reports tracking, select the report and click the "Tracking" button from the top-toolbar
        • You can view the history of the report by clicking on the different steps in the Routing Steps section
      • To send the report back for revision click the "Return" button from the top-toolbar
        • You must enter a reason for the return in the pop-up menu that appears
      • To approve the report click the green "Approve" button from the top-toolbar
    • 3Things to Consider Before Approving a Report (2:32 - 3:38)
      • For Pre-Approval Reports
        • Make sure the proper allocation and account is being used
        • Employee Travel uses account 52100 and Student Travel uses account 523000
        • Make sure there is sufficient budget available
        • Verify the business purpose is the name of the conference
      • For Expense Reports
        • Make sure the proper allocation and account is being used and sufficient budget is available
        • Verify that the proper receipts are attached to all expenses
        • Make sure the expense is reasonable and appropriate for the allocation being used
        • Verify there is a valid business purpose for those purchases
        • If a warning is triggered, make sure there is a reasonable explanation included
        • For Travel and Conference, verify there is a Pre-Approval attached to the expense