Menu

Making Your Microsoft Word Document Accessible

The first step is to scan for accessibility errors/issues using Microsoft Word:

  1. Open the document in Microsoft Word
  2. Open the File menu
  3. Click the Check for Issues button
  4. Click Check Accessibility

Correcting Accessible Issues in Word

If any accessibility issues are found:

  1. Click each issue in the Accessibility Pane 
  2. Correct the issue.

Creating Accessible Word Documents from Scratch

Microsoft Word documents can be made accessible by following the LIST model (Links, Images, Structure and Style) recommended by the High Tech Center Training Unit/Access Center as described below. Navigate through your document and address all of the following for accessibility issues. 

    • 1Links

      The linked text of a hyperlink should be unique and meaningful such that it clearly describes where the link will take the viewer. For example, “Annual Report to the Community” versus the generic “click here.”

    • 2Images and Pictures

      Alternative text (Alt Text) must be added to all images and pictures

      • Alt text should be descriptive and should describe the purpose of why the picture was added. It is not necessary to describe all elements of the picture, especially if the details are not important to your intended audience
      • Alt text should be short similar to the way a tweet is limited to 140 characters.
      • It is acceptable to use a phrase such as For Decoration Only as your alt text.
      • Sample Alt


      Alt Text Sample


      The text in this graphic has also been added to the email itself.


      To add alt text to a picture or image in an email:

      1. Insert a picture.
      2. Right Click the image (Command Click on a Mac).
      3. Click Format Picture.
      4. Click Layout & Properties.

      Alt Text Entry Window in Outlook

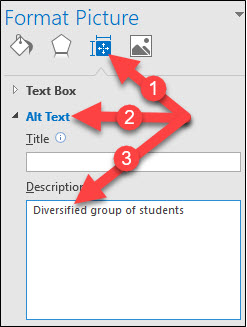
      1. Click the Alt Text arrow.
      2. In the Description area under Alt Text, enter words to describe the purpose of the picture.
      3. Press the Enter key to save.

      Important: Do not enter anything in the Title field.

    • 3Structure & Style

      Use Styles and Headings to organize your document and provide navigation points for your audience. Every document needs a Heading 1 at the top.

      To add a Style or Heading:

      1. Click in the text.
      2. Click the Style name on the ribbon.

      Note: Headings and sub-headings must be in a logical sequential order, where Heading 2 comes after Heading 1 and so on.

      Note: Do not use text boxes. Text boxes are not accessible.

      Try not to have lists of only one item. 

    • 4Tables

      Best Practices for Accessible Tables

      1.  Avoid using tables in an email, especially if the tables are used only to format items into columns. 
      2. Do not merge tables cells.
      3. Do not nest (i.e., insert a table within another table).


      Headers

      If a table is used, the column and row headers must be set.

      1. Select the top row of the table.
      2. Right click (Command click on a Mac) and choose Table Properties.
      3. Navigate to the Row tab.
      4. Uncheck the Allow row to break across pages check box in the Options section.
      5. Check the Repeat as header row at the top of each page checkbox.


      Add Alternative Text

      1. Navigate to the Alt Text tab
      2. Enter a unique and meaningful Title
      3. Enter a Description that briefly describes the purpose of the table


      Clean Up

      1. Delete blank table rows (if applicable)
      2. Enter Text into all cells, leaving no blank cells


Other Considerations

    • 1Color

      Color must not be the sole method for providing information or emphasis. Instead, it is preferable to use bold, italic, or incorporate symbols, such as an asterisk. To make your text easy to read, use dark text on light backgrounds or light text on dark backgrounds. In technical terms, the contrast ratio between text and background must better than 4.5:1 in order to meet the WCAG 2.1 Level AA contrast standard.

    • 2Font Size

      Use a larger font size (11pt or larger), sans-serif fonts, and sufficient white space.


Next, scan the document using the Accessibility Checker to make sure your document meets WCAG accessibility standards.