Making Your PDF Document Accessible
Follow these steps to scan your document. If errors exit, fix the errors. Repeat until all errors are fixed.
-
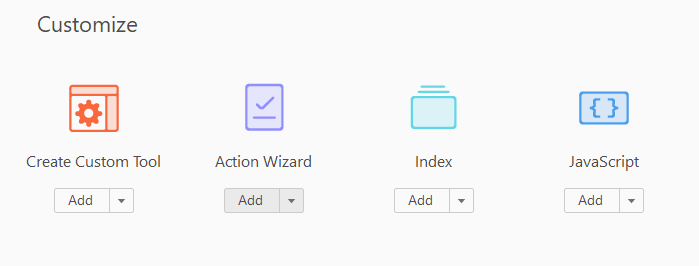
- Setup Accessibility and Action Wizard Shortcuts
- Click the Tools menu
- Click the drop-down arrow beneath Accessibility
- Choose Add Shortcut

Note: Repeat Steps #2 and #3 to Add the Action Wizard
- Step 1: Scan Your Document
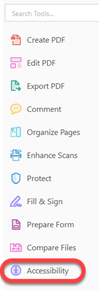
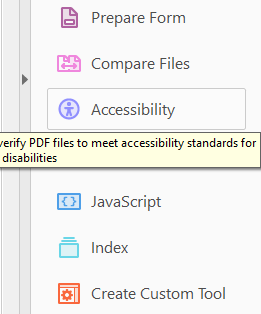
- Locate and select the Accessibility tool
-
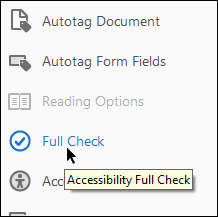
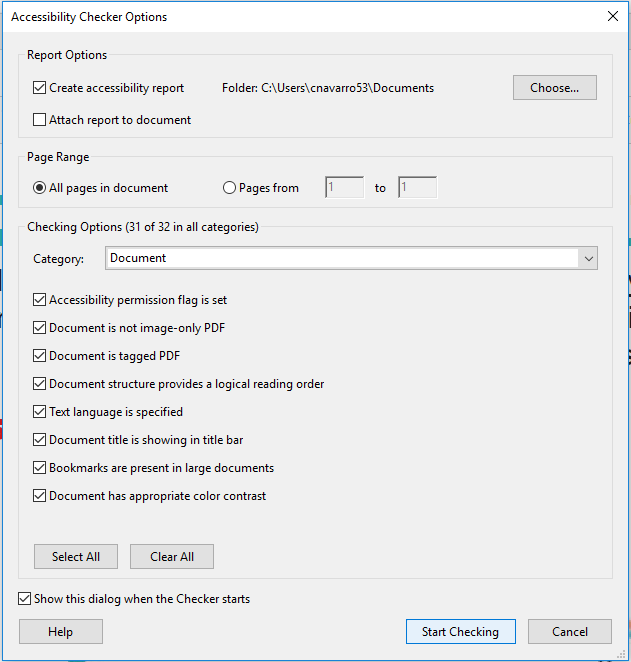
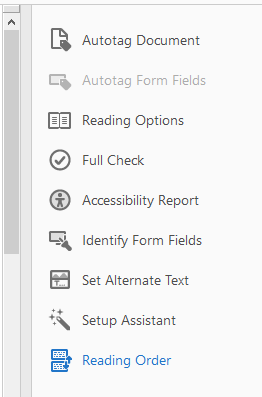
Select Full Check
-
After selecting full check, a dialog box will open. Leave everything the same and select Start Checking.
Note: A panel will appear on the left informing you of the errors on your document.
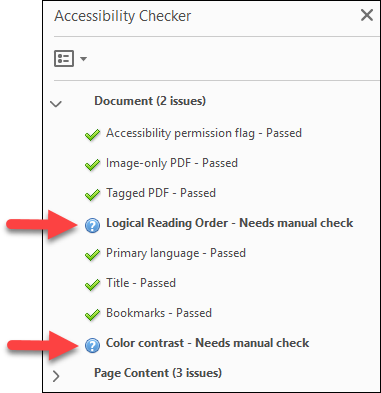
4. Manually check the Logical Reading Order and Color Contrast
If there are errors continue to Step 2.
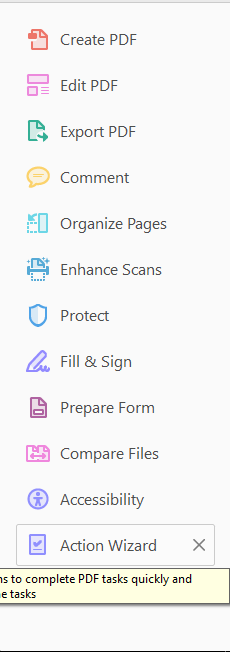
- Locate and select the Accessibility tool
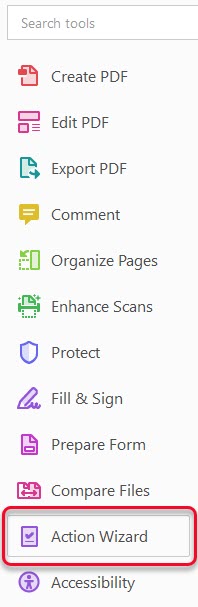
- Step 2: Run the Action Wizard
- Click Action Wizard
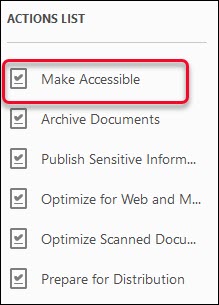
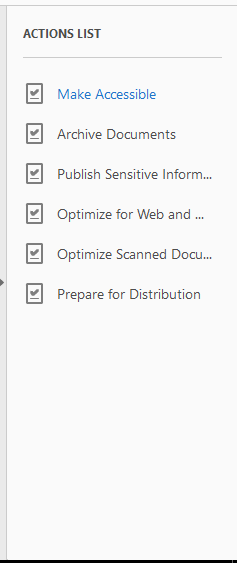
- Click Make Accessible on the Actions List
- Click Start
Alternatively you can Autotag the Document
- Select Accessibility
- Select Autotag Document and hit yes if prompted
- Click Action Wizard
- Setup Accessibility and Action Wizard Shortcuts
Note: It is always wise to check your images for alternate text to make sure meaningful text that describes the purpose of the image has been entered instead of generic such as "image-1.png"
Example
To fix a title error see the instructions below.
-
- How to Fix a Title
- Right click and choose Fix. If it prompts for a title then input one and you are good to go. BUT, If you are not prompted and the error clears, then continue the steps
- Although the error is gone after selecting fix, the problem is still there
- Go to file on the upper-left and select properties
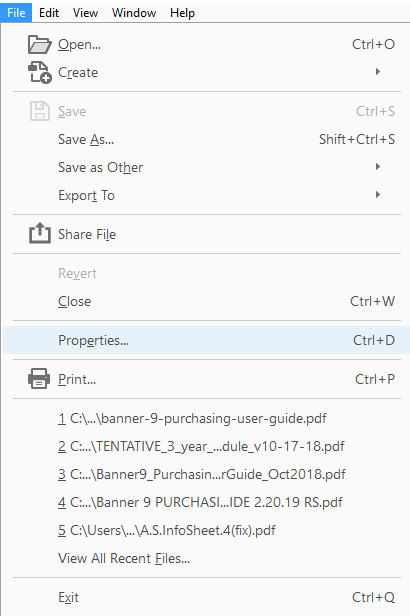
- Input a title and click OK

Manually check the title (as displayed below) it uses valid English words and is not a filename.

(This title is clearly incorrect)
We often times find titles like "MT" and nothing else or "2016-04-25 14:30," which are not valid good titles for a screen reader.
- How to Fix a Title
*Tip*: You should avoid retagging the document after the first time. Retagging the document more than once would undo most accessibility progress made such as fixing alt-text, headings, table headers, etc. There is no undo button in acrobat.
Accessibility Issues (A-Z) and Instructions on How to Fix Them
-
-
- Action Wizard
Action Wizard(The action wizard is no longer recommended)
Use the accessibility action wizard, in Tools, to make a PDF document 508 compliant
Install the Action Wizard
- To install action wizard click on your Tools tab.
- Scroll down the tools menu list until you find the Action Wizard icon. Click the Add button underneath the Action Wizard icon to add it to your tools menu.
- The Action Wizard tool should appear on your tools list menu. Click the Action Wizard button to use on the document you want to make accessible.
Correcting Issues
- After clicking the Action Wizard the Actions List menu will appear. Click the Make Accessible button to start making the PDF accessible.
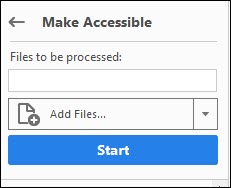
- After clicking the Make Accessible button a new menu will appear with the name of the file to be made accessible. There's
a menu to add other files to make accessible. Once ready click the Start button to begin to make the files accessible.
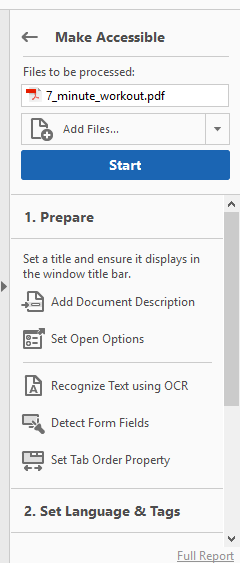
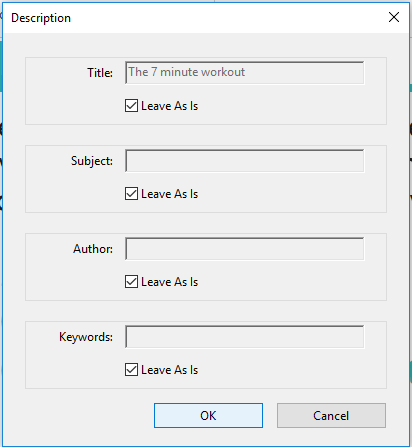
- After clicking the Start button the Description menu will appear where you can give the document a Title, Subject, Author, and Keywords.
After filling out the form fields click the OK button to continue to the next menu to make the PDF accessible.
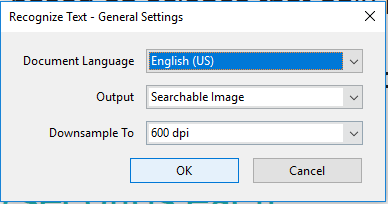
- The next menu that will appear is the Recognize Text menu where you can change the Language, Image output, and Downsample options. Once
all desired settings are set press the OK button to be directed to the next menu screen.
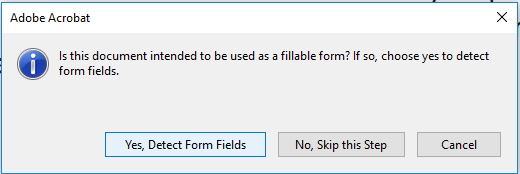
- The new menu that appears asks the user if the document will be used as a fillable
form. If the document will be used as a fillable form click Yes, Detect Form Fields button. If the document does not contain form fields click the No, Skip this Step button.
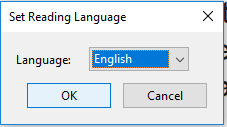
- The next menu that will appear is Set Reading Language which has a drop down menu box to select preferred reading language. After selected click the OK button to continue.
- The last menu that will appear is the Accessibility Checker Options menu. Click the Start Checking button to begin making the PDF accessible.
- After the PDF is made accessible the Accessibility Checker menu will appear. If the document has any remaining issues they will appear on this menu.
- To install action wizard click on your Tools tab.
- Field Descriptions Failed
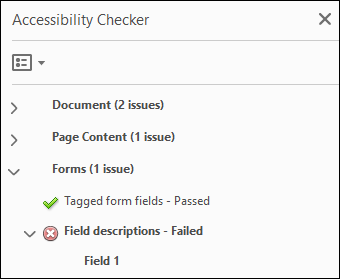
Why this problem occurs:
Fields are used in form documents. The Field Descriptions – Failed error means Alt text is missing for one or more fields in the form. In other words, if a screen reader were to read that specific form field out loud, there is no description to give. So let's add one.
How to fix:
- Click the Prepare Form tool along the tools panel.

Note: If the Prepare Form tool is not visible, you can add it using the Tools menu.
- Click Field 1 in the Accessibility Checker pane to display that field in the Prepare Form. (The field will be highlighted).
- Right click the field in the Prepare Form
- Click Properties.
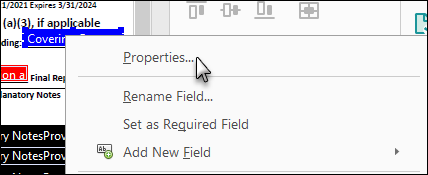
- Enter alt text into the Tooltip box that describes the purpose of the field.
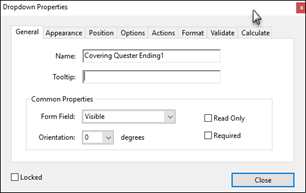
- Click Close.
- Right click the field in the Prepare Form tool again.
- Click Properties and confirm the Tooltip is filled with alt text.
- Right click Field 1 in the Accessibility Checker pane.
- Click Check Again.
- Repeat until all Field 1 errors are fixed and Field descriptions – Passed is displayed in the Accessibility Checker.
Note: View the How to Fix Field Descriptions Failed video for a live demo.
- Click the Prepare Form tool along the tools panel.
- Figures Alternative Text - Failed
- Expand the error, right-click figure 1, and click fix
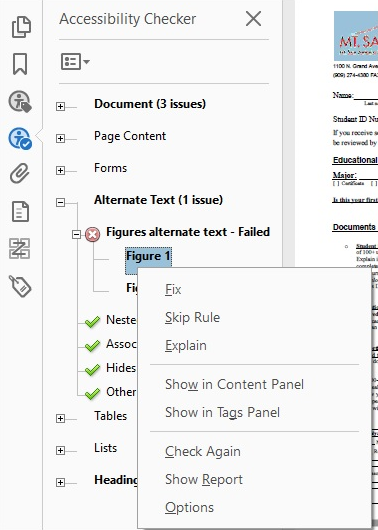
- The Set Alternate Text window is now open. Simply input a description of the highlighted image.
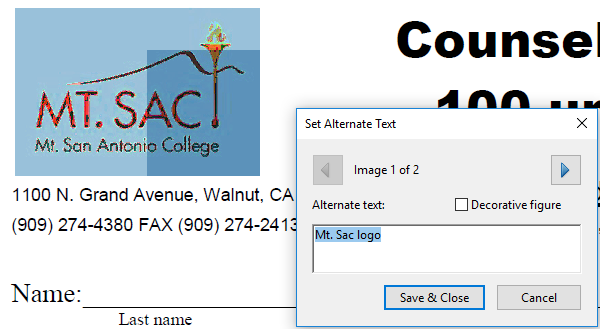
- Be sure not to say "Image of...". Just describe exactly what's there in 25 words or less.
- If the figure is just for decoration like a pencil icon or a little hat image, check the Decorative Figure box.
- Click the arrow to fix the next figure or select Save & Close to finish.
- Expand the error, right-click figure 1, and click fix
- Headings Errors: Appropriate Nesting - Failed
- Expand the tree
- Right click Element 1
- Click Show in Tags Panel

- Double Click the highlighted tag
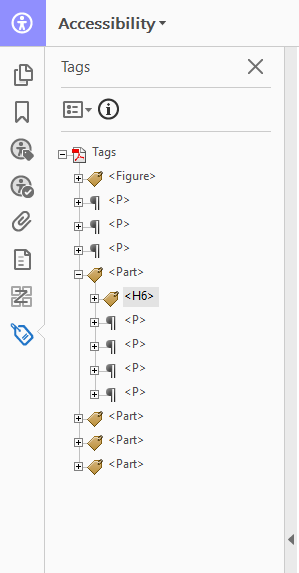
- Change it to the correct heading level (e.g., H1, H2, H3).Make sure the headers are in order and it's not going from <H1> to <H3> or starting off at <H2> rather than <H1>.
- Save
- Rescan the document
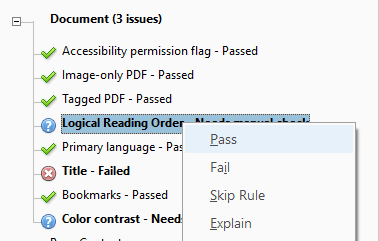
- Logical Reading Order - Needs Manual Check
- Click Accessibility.
- After clicking on accessibility click on Reading Order in the new menu.
- After clicking the reading order button the touch up menu will display. Click Show Order Panel button to display order panel.
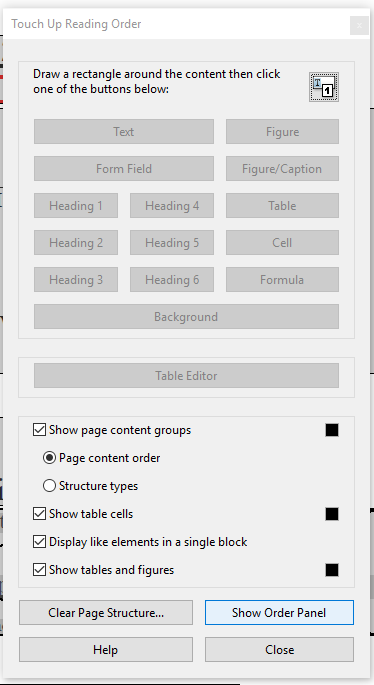
- The document will be displayed with the reading order and reading order panel .
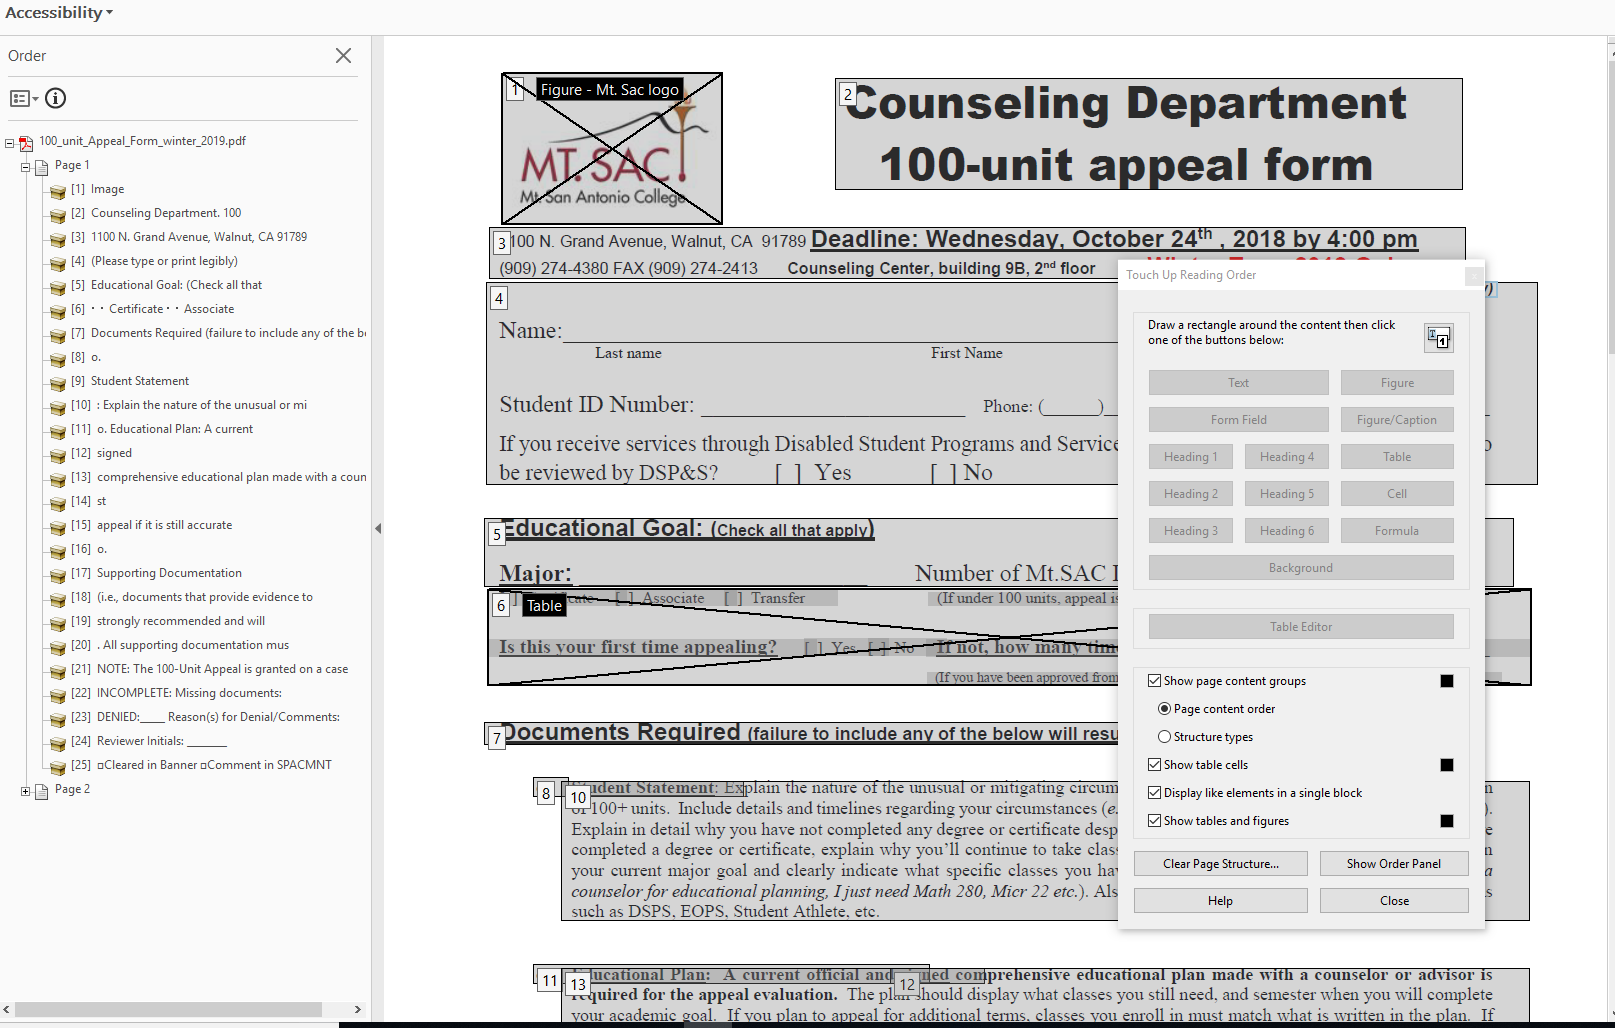
- Manually check to make sure the items are listed in the same order you would read
the document. If not simply drag them into the correct order.

- After making sure the reading order follows a logical reading structure click the
accessibility checker button on the left
 .
. - Expand the Document issue tree and right click on Logical Reading Order. Click pass on the sub-menu that pops up.
- Click Accessibility.
- Action Wizard
-
-
-
- Show Accessibility Tool
Note: If Accessibility does not appear in your sidebar, you will have to add it for the first time.
- Click the Tools menu
- Click the drop-down arrow beneath Accessibility
- Choose Add Shortcut
- Table Errors: Headers - Failed
1. Click on Tables tree to expand it.
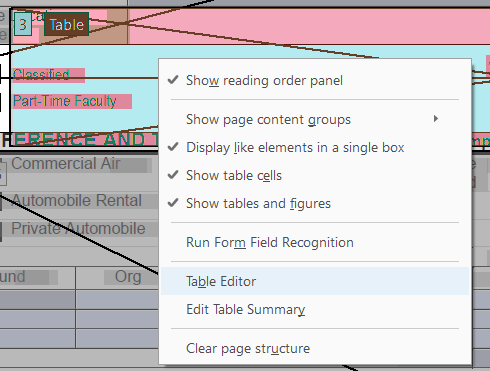
2. Highlight the Element you want to fix. It will highlight the table and redirect you to the page with the table error.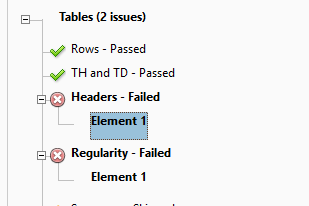 3. Click Reading Order to show the structure blocks on the page.
4. Right click on the table that you're trying to fix. A sub-menu will appear. Click Table Editor on the sub-menu.
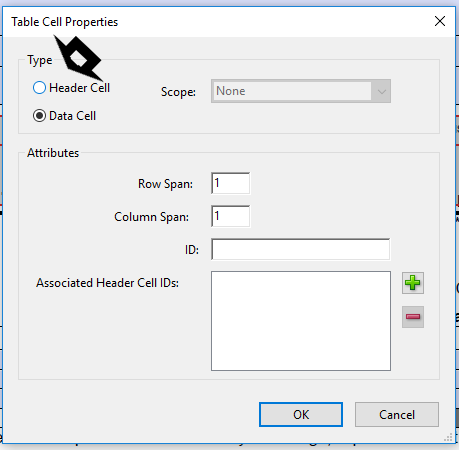
5. After right clicking table editor the table will show the table data cell structures. Right click the data cells that should be table headers(normally the very top square cells). Click Table Cell Properties.
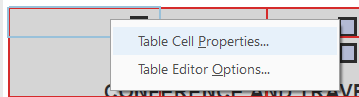
6. A Table Cell Properties menu should appear where you will change the property type to Header Cell and click OK to finish. Do this to all data cells that should be header cells.
7. re-scan the document. The table header issue should be fixed.
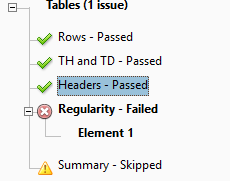
- Table Regularity - Failed
Two options are available to fix Table Regularity - Failed
Option 1
- Ensure your Accessibility Tools are open on the right side of your Adobe Acrobat.
- Next, Autotag Document
- Re-scan the document again and the error should be gone.
Option 2 (if option 1 doesn't work)
- Right click Element 1 and select show in tags panel.
- Expand each and every row (<TR>) of the highlighted table.
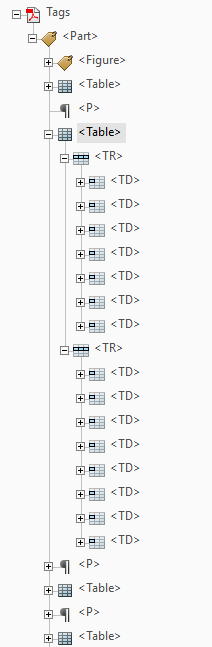 (Notice in the image above, the first table row (The <TR>) has 7 table data cells (The <TD>'s), while the second has 8. Your error is happening because one or more of your <TR>'s has a different number of <TD>'s.
 - Now you have to count how many <TD>'s are in each <TR> within your pdf.
- Once you've discovered the Row that needs more or less <TD>'s, right-click inside the row and select New Tag...
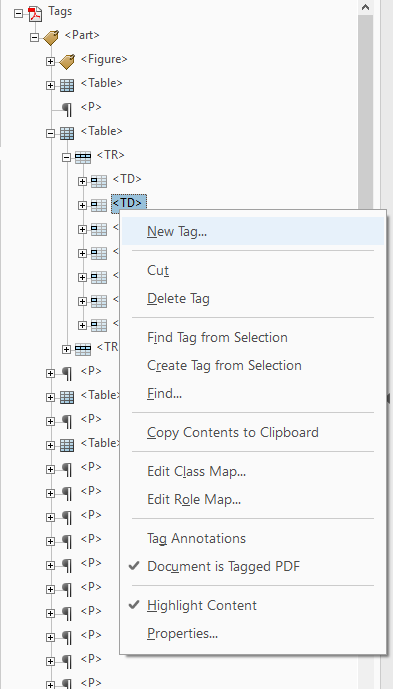
- Chose Table Data Cell type and select OK without inputting a title.
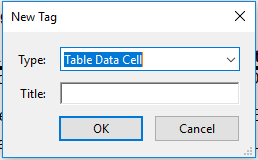
- A new <TD> tag should appear after the last step. Now recheck the document and your error should be gone.
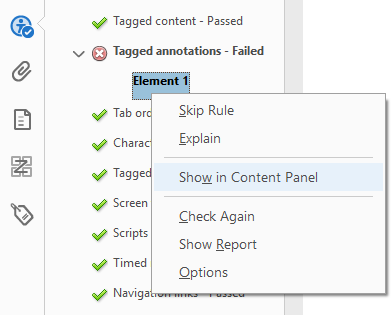
- Tagged Annotations/Content - Failed
- Right-click element 1 and Show in Content Panel.
- Next, right-click the highlighted content and select Find.
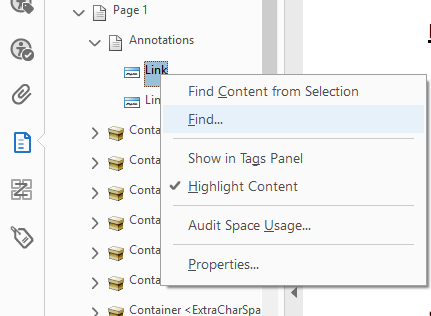
- Then, you have to find the type of untagged content you're looking for. In the case
below, it's a link, so we're going to search for unmarked links. Also, select search document rather than search page, unless you'd like to do this
one page at a time.
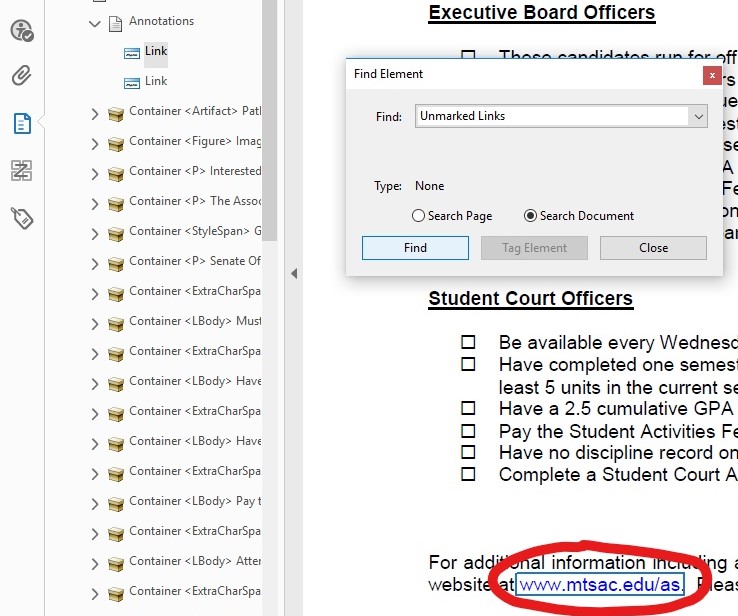
- Click Tag Element to launch the new tag box. Enter a Type of the tag matching the content. In our case it's a link so we'll use the Link tag. If it were text instead for example, we would be using the Paragraph tag.
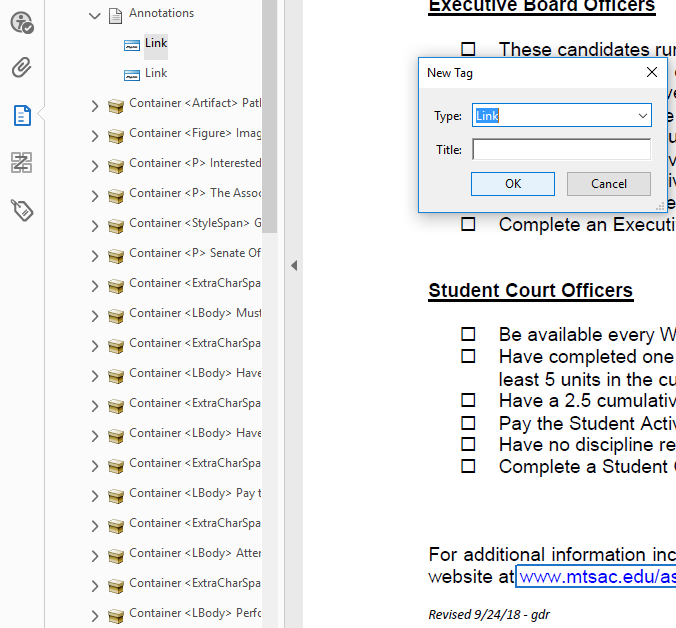
- Leave the title section empty and hit OK.
- Tag any other elements it automatically brings up and Re-scan the document to clear the error.
- Right-click element 1 and Show in Content Panel.
- Show Accessibility Tool
-
